beyond teck

  • Subscribe to our RSS feed.
  • Twitter
  • StumbleUpon
  • Reddit
  • Facebook
  • Digg

Wednesday, 30 July 2008

The device driver for your network card is preventing PC from entering standby or hibernation

Posted on 16:23 by Unknown

I recently discovered another problem that comes up often when you update your computer to Windows XP SP3. It seems as though you can’t put the computer into standby because somehow a network card prevents it from going to bed. Turns out, you now have to tell Windows XP that it can turn off the card to save power. Here’s how you can stop the computer from giving your errors when you put it into standby or hibernation. In addition to that, you can also prevent your computer from loosing the wireless connection when it resumes from standby or hibernation mode.

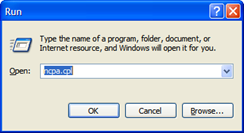
First, click on Start and then click Run. Of course, you’ll need administrator privileges to be able to do so. Then type in

ncpa.cpl

image

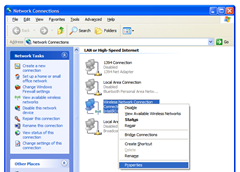
And in the window that comes up, right click on your wireless network card or network card in use at the moment. It’s usually going to have the blue monitors, if you have more than one network card, you’ll have to right click on the one that bears the word ‘wireless’ in its name. Then click ‘Properties’.

image

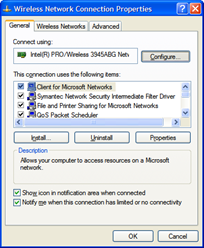
In the properties window, go to the ‘General’ tab and click Configure'.

image

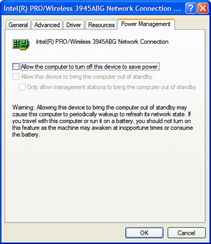
Click the Power Management tab and uncheck the box that says Allow the computer to turn off this device to save power and click OK.

image

Once you do this, also click OK in the properties windows, and now your wireless card will play nice with the operating system. So, when you wake up your computer from standby or hibernation, it’ll make sure your card is able to go out and talk to your router (i.e. stay connected with the router) and it’ll also allow your computer to go into standby mode or hibernation mode without causing any errors.

Read More
Posted in error, Windows XP, wireless | No comments

Bypassing the Login or Welcome Screen in Windows

Posted on 16:01 by Unknown

If you happen to be lucky enough to have a computer that only you use on a regular basis, allowing the computer to automatically load your user account right after booting-up might save you a lot of time. I often do this on my old windows computer that has Windows XP, and since it doesn’t contain any sensitive information because it takes ages to boot up. So, I simply turn on the computer, go for a walk, have some coffee, take a nap and when I come back my ol’ faithful computer will always be ready to rumble. If you too would like to do this, here’s how you can do so.

First, keep in mind that automatically logging into your account might not be a good thing, especially if you have all your passwords stored on your web browser. So if you’re paranoid about someone logging into your account, you might want to delete password/temporary files/cookies information from your PC first before implementing the bypass screen hack.

Notice how I only have one account on my computer, however if you have two, Windows will ask you which one you want to use:

image

Once you confirm that you have only one account (without any other accounts such as the guest account enabled) click on Start and click Run. If you're running Windows Vista, you'll have to click on the Windows Orb/Start Button and type in the following in the search box. Inside the box that pops-up type in:

control userpasswords2

like so:

image

Then, in the box that pops-up just uncheck “Users must enter a username and password to use this computer”. And click OK. If you have more than 1 user on your computer, windows will ask you which user's account you'd like to use and you'll have to provide the password for that user.

image

Once you do so, your computer will automatically take you to your account right after boot-up, so you don’t have to wait for couple of hours more after clicking on your account name when you get the ‘Welcome’ screen (or password prompt).

Read More
Posted in tip, Windows Vista, Windows XP | No comments

Tuesday, 29 July 2008

5 Cool Tips for Creating Better Scans

Posted on 12:04 by Unknown

If you tend to scan a lot of stuff, these tips might be really helpful. A while ago, I had to scan a whole book, and I realized that the default scan settings just weren't good enough. Especially for pictures and mathematical notations. They just don't seem to come out properly. So if you would like to tweak your scanner settings to create better quality scans then read on...

Turn off Auto Cropping

The number one problem I find that my scanner (notice I say my scanner, which might mean that such problems might be confined only to the scanner I have) does not seem to do a good job if I simply set the mode for scanning. Nor does it scan everything I place on the flat bed, it seems to crop things out, thinking it to be unimportant. Not only it this super annoying, but it also wastes a lot of time, so here are a couple of settings (applying these settings will of course, differ depending on your scanner, so you'll have to check the manual)

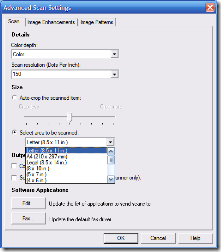
In my case, it was opening up the set-up utility, going to advanced settings for scans and selecting the area to be scanned. Since most of the stuff I scan in letter format, I usually keep it on letter.

selectareascanned

Choosing the right DPI

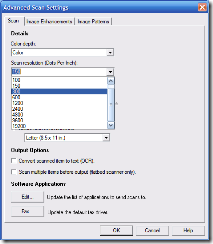
Usually, scanner do not scan at a high DPI, unless you specify it to. However, unless you're really running low on hard disk space, I recommend that you should bump up the DPI settings to at least 300 DPI. Yes, the time it takes to scan something will take much longer, but the quality will be much better. Of course, once you have the actual scans you can do whatever you want with them, even reduce the quality if need be. Plus, if you were to print out (especially if you were to create big size posters) these picture or documents that were scanned at a high DPI, the image quality of the overall print will be significantly better. So, if you have the option, make sure you scan at 300 or the highest DPI possible.

highdpiscan

Always scan everything in colour

Why would you scan things in black and white, if you're transferring the data to your computer instead of directly printing it out. Scanning in colour gives you the option to do whatever you want with it once you've scanned it. I also find that a lot of detail is ignored by the scanner when it scans simply in black & white. If you want to be on the safe side, I'd say colour is the way to go.

Scanning dark text on a light background

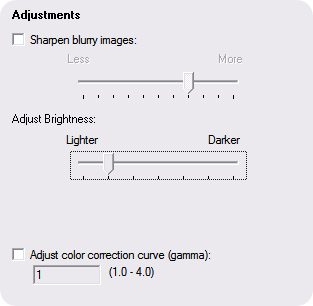
Often, I find that scans of light text on a dark background are less than satisfactory. Especially if the light text is white and the dark background is black. It seems that most scanners have the options of specifying the brightness of the image being scanned, so in such cases it is best to bump up the brightness a little bit. It might help in getting a better result.

adjustments

Remove Patterns on Paper

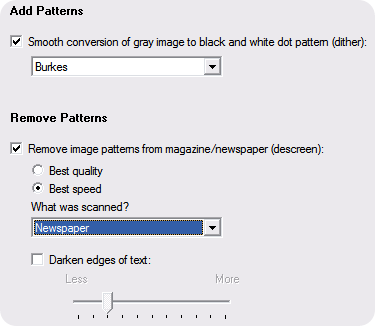
Another great features that scanners have is to automatically, although not accurately, detect any unwanted patterns in the background of the item being scanned. For example, if the paper you are scanning is a bit crinkled, it will automatically try to remove the marks on the paper, resulting in a better scan overall.

addpatterns

Following the tips above when you scan something will assuredly improve the quality of scans.

Read More
Posted in peripherals, tip | No comments

Saturday, 5 July 2008

Microsoft Word - Disable automatic hyperlinks

Posted on 19:45 by Unknown
Don't you just hate having to deal with those annoying hyperlinks every-time you type in a website or e-mail address in Microsoft Word? Not only does it look horrible when you print the document out (especially if you're doing a resume or a report). Plus, if you accedently click on it, I find that the computer slows down to a crawl for several seconds before responding to the click – not exactly great if you ask me. 

Here's how you can turn off this annoying feature (if you in fact find it annoying like me) for good. You can of course right click on the hyperlink and click 'Remove Hyperlink' or if you're on a Mac right click and 'Edit Hyperlink' > 'Remove Hyperlink', but I simply prefer a much more permanent solution.


The solution to this is pretty simple:

How to turn off automatic Hyperlinks in Microsoft Word!

1. Click on the Tools menu in the menubar and click 'AutoCorrect Options'. If you're on a Mac you can click on 'Microsoft Word' in the menubar and click 'Preferences'.
2. Click on AutoCorrect Options.
2. Switch to the 'AutoFormat As You Type' tab
4. Uncheck the checkbox beside 'Internet and network paths with hyperlinks'

5. Click OK.

Viola! No more automatic yucky hyperlinks!
Read More
Posted in Mac, Microsoft Word, tip, Windows | No comments

Security Errors Detected!

Posted on 14:59 by Unknown
It's times like this when I say to myself. Wow, isn't it great I have a Mac. Sure, only a small percent of people use a mac, but at least I won't have to worry about sites like this:

Read More
Posted in Mac, Windows | No comments

Back up and Restore your Address Book Contacts on OS X

Posted on 09:03 by Unknown
Having your contacts stored in a digital format on your Mac can mean one of two things:
1. It is highly accessible and searchable.
2. You can loose it in a flash if you don't back it up.

When the work back up comes to mind most people think of a .mac account or something similar, however you really don't need a .mac account (or a mobile me account for that matter) to be able to back up data on your mac. All you need is to know how to do it with Address book.

How to back-up data and contacts on Address book in OS X 10.4 Tiger

Backing up your address book on Tiger is actually more easier than doing so in Leopard. All you need to do is click on
1. File in the menubar
2. Back up Address Book

How to back-up data and contacts on Address book in OS X 10.5 Leopard

If you're in Leopard you'll need to do this:
1. Click on File in menubar
2. Click on Export
3. Click Address Book Archive


Also keep in mind that contacts that were backed up on an older version of OS X will import / restore fine into a newer version. However, you cannot import contacts into an older address book version (such as the on in 10.4 Tiger) from a newer one (like the one in 10.5 Leopard). So you might have to export each contacts vCard which you can then import into Tiger's address book or an older address book version.

How to restore data and contacts on Address book in OS X 10.4 Tiger

To restore you data simply do the following:
1. Click File in the menubar
2. Click 'Revert to Address Book Backup'
3. Browse for a backup you have your computer (hopefully you've managed to make a backup before you realized you have to restore something.

How to restore/revert data and contacts on Address book in OS X 10.5 Leopard

If you're in Leopard you'll need to do this:
1. Click on File in menubar
2. Click on Import
3. Click Address Book Archive

Now you have no reason to not backup your contacts.
Read More
Posted in Mac, tip | No comments

Tuesday, 1 July 2008

Clear Passwords, Private Data, Cache, Cookies and History in Browsers

Posted on 18:17 by Unknown
Often, browsers such as Internet Explorer or Firefox store data in their cache. Data such as browsing history, form data (your name, address, phone number etc. that you filled in while buying stuff from amazon!), passwords and snapshots of web pages are collected. Now, if you were a paranoid user, you'd probably disable all these features.

But they were simply put in there to make our life much more easier. Internet Explorer (or any other browser for that matter) stores our passwords so we'd never have to type them again. It stores our webpages so that we'd never have to wait for it again. It stores our name so that we'd never have to remember it again. Yes. That's how much we can leave to the computers to remember.

However, what do you do if you don't want the browser to remember it? This article explains how to clear your private data for Internet Explorer 7, Internet Explorer 6, Mozilla Firefox and Safari.

Note: If you are using Internet Explorer or Firefox or Safari or any browser in a public setting (office, school, libraries, community centers), these tools menu and settings mentioned below are usually DISABLED! The only way to make sure that the computer doesn't remember your password when you're checking your e-mail is to make sure the 'Don't remember my password box' is unchecked! Most organizations make sure that your data is deleted every time you log off, but better to be safe than sorry!

You might also want to use this method to make Internet Explorer or Firefox run faster if you find that your browser is running too slow, and you're using Windows XP or Vista.

Clear Private Data, Empty Caches, Delete Passwords and and Remove Cookies in Internet Explorer / Firefox / Safari and so on.

Doing so is pretty simple for each browser:

How to clear private data in Internet Explorer 7

1. Open Internet Explorer
2. If you don't see the menubar it's probably hidden. Press the Alt key so that it will reveal itself.
3. Click on Tools and Click Internet Options

4. In the Internet Options Window click on Delete button under the 'Browsing History' Heading.

5. Then click on Delete corresponding to the information you want to delete.
6. If you want to delete everything just click on the Delete all button.

How to clear private data, passwords, cache and cookies in Internet Explorer 6

1. If you have the older version of Internet Explorer, I strongly urge you to update your computer. However, if you're using Internet Explorer in a public setting -- like a library or at your school/office.
1. In the Tools menu, select Internet Options... .

2. Click the Content tab, and then click the AutoComplete... button.

3. To remove stored passwords, click Clear Passwords.

To clear stored data that you have entered into forms, click Clear Forms.

4. Click OK.

To delete other internet cache data you'll have to use this method. Using disk-clean or CCleaner up will also clear your cache and other data that Internet Explorer had.

How to clear private data, passwords, cache and cookies in Firefox

Clearing private data in Firefox is even easier.
1. Click on Tools in the Menubar and then click on 'Clear Private Data...'


2. In the window that pops-up, choose the information that you'd like to delete. I always delete everything except my passwords, because its really hard to remember the password given the amount of sites one has to register to...

Clearing Private Data, History, Password and Cache in Safari

Safari on the other had has several different options that you can use to delete data.

Clearing only the history

To do this simply click on 'History' in the menubar and then on clear history at the bottom of the menu.

Clearing only the cache

If you only want to delete the pages that were stored in safari, you might want to click on 'Safari' in the menubar and click on 'Empty Cache'. This will only delete the cache.

How to clear everything including cookies, cache and history and reset Safari

To do this click on 'Safari' in the menubar and click on 'Reset Safari...'. A window will pop-up asking you what you'd like to clear. Simple check the checkboxes corresponding to the information you'd like to clear and click OK.


Read More
Posted in firefox, internet explorer, tip | No comments

How to create .ZIP files on your Mac

Posted on 12:20 by Unknown
Sometimes, its hard to send/recieve a bunch of files together either because there are too many of them or they are too big to fit in an e-mail attachment. A friend of mine the other day asked me if it was possible to create a zip file in on a Mac. "Of course you can create a zip file on your mac," I said. Then I explained to him how one could create a .zip file.

Well, actually creating zip files is really easy - all you need to do is select a bunch of files, right click and click 'Compress 3 Items'. And although it doesn't mention zip anywhere, the mac is going to create a zip file named 'Archive.zip' for your. On previous versions like Tiger, I think it was called 'Make Archive' or something like that, but I'm sure anyone who knows some rudimentary english can figure it out, as long as they know they should right click after selecting the files. Pretty easy huh?

But, what if you wanted to use a better "command line way" to compress these files into something else like a .gzip file or a tarball file? Well you can do that too:

First open terminal and cd to the required directory (tip: just drag and drop the folder from a finder to the terminal window to put its path after typing in cd), then use tar -cf [destination name].tar [source files]. Works great!
Read More
Posted in Mac, tip | No comments

Convert Youtube FLV files to AVI, WMV and MP3 for Free with VLC

Posted on 11:09 by Unknown
Many people who use VLC don't know this but you can actually use it to convert a file from one format to another. You can also use it to extract the audio out of a audio/video file like a FLV file. (This also works for VOB files too). The instructions for doing so are pretty simple. First you might want to download the video that you'd like to convert into MP3 or WMV or AVI or... you get the point. Although you can use online websites to do this for you doing it this way gives you much more control, which is a good thing.

And you'll need Videolan's VLC too. So you might want to download that before you proceed.

How to convert from Youtube/Myspace/iFilm FLV to AVI/WMV/MP4/MP3 and so on really fast and completely for free

1. Once you download the FLV video, you'll have to open it with VLC first. To do that just drag and drop the video file onto VLCs icon, or open it up through VLC by going into File > Open File...> Browse for your .FLV file
2. Once it starts playing, let it load completely... I suggest that you watch the video till the end before you start.
3. Then stop the video and click on File > Streaming/Exporting Wizard...


4. In the window that pops-up select 'Transcode/Save to file' and click Next


5. Select 'Existing Playlist Item' and choose the video that you'd like to encode


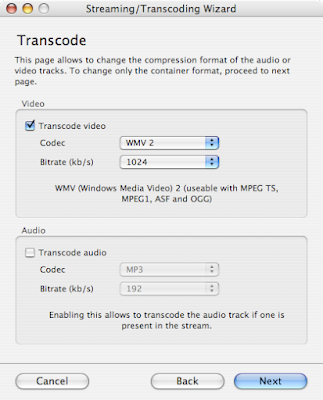
6. Check Transcode Video and Transcode Audio and choose your settings for exporting. If you just want MP3 audio then only check 'Transcode Audio' and click Next.


7. Choose your encapsulation format and click Next


8. Choose the location for your file and give it a name


9. Click on Finish and let VLC do its job!

There you have it! A free way to get your videos from the FLV format to pretty much any format you wish. Plus it takes a lot less time than online websites.
Read More
Posted in downloads, free, tip, youtube | No comments

Convert online FLV Videos to MP3 or AVI or WMA...

Posted on 10:20 by Unknown
Note: Often the videos of songs on youtube are copyrighted material that belong to the record company. Downloading such videos or converting to them to MP3s might be illegal. Also, the quality of audio embedded in youtube videos is extremely poor and I'd rather not listen to the song at all than to create a MP3 of it from youtube.

So, I'd only recommend you use the following ways if in fact you don't have any other viable option left. You can also read about using VLC to convert/transcode youtube videos to ANY format that you like including AVI, WMA, MP4 and so on. Of course you'll need to know how to download the videos from such sites first.

Method 1: Using an online website

Yes, it is actually possible to create a website that is going to take the video from youtube and encode it into a usable MP3 file. Although this option might be the easiest, it takes the longest time. And if you consider yourself to be a bit tech savvy then you might want to skip to method 2.

VidtoMP3 - A service that takes youtube and myspace videos, digests them and spits out a MP3 file. A lot of annoying banner ads on this site though.


Vixy - Another service that takes flv video of all sorts and converts it into something more usable.

Method 2: Using an application to do it

If you're on windows there are a lot of freeware applications out there that can do this for you - however beware of malware causing apps that pretend to be freeware. Some good ones that I like are:

FLV to MP3 Converter - A free converter that lets you convert FLV videos from online video sharing websites to an MP3 and provides ample choices on how you'd like to do it. You can change the bitrate and so on to meet your preferences (and disk space). You're going to need the FLV file on your computer firs though... if you don't know how to do that you can check this post.

VLC - You can learn more about using VLC to do this in this post.
Read More
Posted in free, tip, youtube | No comments

Download online .FLV videos from any site including Youtube on Macs

Posted on 10:00 by Unknown
If you have a mac, then your life is going to be a whole lot easier when it comes to downloading videos. Safari, a web browser that I really adore because of its 'lightweight' factor and speed can do more than just display webpages. It can also show the videos that are being loaded in the background, providing you with the URL of the video that you're about to view - which of course makes it all the more easier for you to download the video. You can of course use other methods mentioned in this post, but why sweat it when you have an easier way? Here's how you can perform the feat:

Step 1: Get the Activity and Downloads window ready

1. After you've selected the perfect target (i.e. the video that you'd like to download) click on Window in the Menubar
2. Then click on Downloads - the download window will pop-up... once it does just place it beside your desktop
3. Then click on Window again and click on Activity

Step 2: Getting the video

Refresh the webpage if you're on the webpage that has the video or navigate that webpage. Once the webpage starts loading, you'll notice that Safari starts downloading a big file in the Activity Window. This file will usually be greater than 2 MB or so, but nevertheless it will be the biggest file. This is the .FLV video file that Safari is loading... the file you need to download.

Quickly click on the file in the Activity window then press Command + C then click on the Download window and paste the file in there using the keyboard shortcut Command + V. Safari will then start downloading the file to your desktop! You can then convert the file to a much more usable format.

In the screenshot below (click to magnify) the highlighted file is the file that is being downloaded...


Read More
Posted in Mac, tip, youtube | No comments

How to download online videos from any website!

Posted on 09:52 by Unknown
Although downloading videos from youtube is a shady activity, sometimes youtube videos have great content that are useful in presentations and other videos. So, point in mind, here's how you can download youtube videos.

There are primarily two ways of downloading youtube videos or videos from any other such website like metacafe, google, iFilm and pretty much any website that has videos in the FLV format, not just youtube. 

The first is to use a website that'll provide a link to the video download and the second is to use an application or extension that was meant to download youtube videos. If you use a mac then you can also use Safari to download youtube videos. If you want to convert the videos into AVI, WMV or MP3 files then you might want to take a look at this post.

Method 1: Download videos from Youtube using online websites

Keepvid.com - A great site that allows you to download videos from any online video website.


Vixy.com - A service that not only downloads the videos but also changes the format to a much more widely accepted format like a .AVI file or a .WMV file and so on. This take a longer time though, and I much prefer downloading the video first and using this method to convert the files.

Method 2: Using applications and extensions to download the video

Magic's Video Downloader - a great extension for Firefox that allows you to download from all different kinds of online video sites, all without leaving the webpage.


Youtube Downloader - A nice little tool to help you download videos from Youtube, Google Video, MyspaceTV etc.


In order to view these videos though you will have to convert them into some other formats, unless you have something like VLC which can play .FLV files and VLC can also convert it into something else for you.
Read More
Posted in downloads, free, youtube | No comments

How to Auto Start Applications on the Mac

Posted on 09:24 by Unknown
Sometimes, its great to just turn on your computer and let the computer do everything it can before you jump in and start doing your work. Having your computer open applications for you as soon as you log in is a great thing, and plus its really simple to do on a mac too!
Here's how you can have applications or scripts open up as soon as you log-in onto your mac:

Method 1 - Applications in the dock


If you have applications in the dock that you'd like to start up as soon as you log simply:
1. Right click
2. Click 'Open at Login'


Simple enough.

If its not on the dock or if its a apple script that you'd like to execute (like my never ever forget a birthday ever again apple script) you'll have to do this:

Method 2 - Using system preferences to manage login items


1. Click on the apple menu
2. Click on System Preferences


3. Click on Accounts
4. Switch to the Login Items tab
5. Here you can click the '+' and select the application or script that you'd like your computer to launch.


So now I have no excuse to open mail and start answering all my e-mails. But on the bright side, I'll never forget a birthday again!
Read More
Posted in apple, Mac, tip | No comments
Newer Posts Older Posts Home
Subscribe to: Posts (Atom)

Popular Posts

  • The Beyond-Teck Search Plugin
    I realize that it is hard to come to the site all the time to search for something. Especially when you are studying for tests, using the bl...
  • WeTransfer Job Ad
    I like using WeTransfer to transfer things that don't fit in emails, mainly because the site is fast, has a large upload limit (2GB!) an...
  • How to immitate the immaculate desktop on a Mac
    Having a immaculately super clean desktop for me means that I can concentrate on the task at hand without being distracted by the little ico...
  • The 5 Dollar DIY Laptop Cooling Stand
    You won't find a cheaper laptop stand anywhere. Yup, you guessed it. It's actually a stapler. But guess what? It works! Although it ...
  • Contact Me!
    Okay so you want to contact me for something? No Problem! E-Mail You can send all your questions , comments , tips (I need a lot of those)...
  • Readable - A web app that makes it easier for you to read webpages
    Let's face it... Although we've come a long way from the first webpage on the internet the most used method of communication on the...
  • Google Easter Egg: Change your language to Bork! Bork! Bork!
    Just recently I was watching a video of Marissa Meyer talking about how Google goes about optimizing their site to incease performance and u...
  • Internet Explorer Crashes All the Time
    Recently, I noticed that whenever I used IE for browsing websites (just browsing… average websites without any extraneous java application o...
  • What is Bootsec.Bak? Can I delete it?
    Today when I was browsing through my C: folder, which I don’t always do, I noticed that I had a lot of junk on there. Most of it seemed to b...
  • Fixing Windows or Linux With Knoppix
    Extreme Tech had published a few articles a few days ago on how to use Knoppix to rescue Windows , and now they've published an article...

Categories

  • addons
  • adobe
  • ads
  • adsense
  • apple
  • audio
  • blackberry
  • blog
  • blogger
  • blogging
  • cars
  • cellphones
  • clean
  • code
  • comments
  • cricket
  • downloads
  • ebooks
  • email
  • error
  • file sharing
  • firefox
  • fixes
  • free
  • games
  • gas
  • Gmail
  • google
  • hack
  • hotmail
  • installs
  • instant messaging
  • internet
  • internet explorer
  • ipod
  • laptop
  • Linux
  • Live Writer
  • lol
  • Mac
  • mac. mail
  • mail
  • messenger
  • microsoft
  • Microsoft Word
  • money
  • msn
  • music
  • Musings
  • network
  • news
  • online
  • Outlook
  • page
  • peripherals
  • phones
  • photo
  • photoshop
  • php
  • plagiarism
  • problems
  • productivity
  • programming
  • projects
  • rant
  • Registry
  • Review
  • school
  • Screenshots
  • search
  • security
  • software
  • spam
  • speech
  • speed up windows
  • spyware
  • sysfader
  • technology
  • tip
  • tricks
  • tutorials
  • ubuntu
  • updates
  • video
  • virus
  • voip
  • web
  • wi-fi
  • Windows
  • Windows 7
  • Windows Vista
  • Windows XP
  • wireless
  • work
  • wtf
  • youtube

Blog Archive

  • ►  2013 (5)
    • ►  October (2)
    • ►  August (2)
    • ►  March (1)
  • ►  2012 (6)
    • ►  December (1)
    • ►  October (1)
    • ►  June (1)
    • ►  May (1)
    • ►  January (2)
  • ►  2011 (19)
    • ►  October (1)
    • ►  August (1)
    • ►  July (8)
    • ►  June (1)
    • ►  February (4)
    • ►  January (4)
  • ►  2010 (41)
    • ►  November (1)
    • ►  October (3)
    • ►  September (3)
    • ►  August (2)
    • ►  July (12)
    • ►  June (2)
    • ►  May (5)
    • ►  April (3)
    • ►  March (4)
    • ►  February (4)
    • ►  January (2)
  • ►  2009 (59)
    • ►  December (1)
    • ►  November (1)
    • ►  October (1)
    • ►  September (3)
    • ►  August (4)
    • ►  July (4)
    • ►  June (14)
    • ►  May (1)
    • ►  April (3)
    • ►  March (3)
    • ►  February (4)
    • ►  January (20)
  • ▼  2008 (108)
    • ►  December (22)
    • ►  November (10)
    • ►  October (14)
    • ►  August (13)
    • ▼  July (13)
      • The device driver for your network card is prevent...
      • Bypassing the Login or Welcome Screen in Windows
      • 5 Cool Tips for Creating Better Scans
      • Microsoft Word - Disable automatic hyperlinks
      • Security Errors Detected!
      • Back up and Restore your Address Book Contacts on ...
      • Clear Passwords, Private Data, Cache, Cookies and ...
      • How to create .ZIP files on your Mac
      • Convert Youtube FLV files to AVI, WMV and MP3 for ...
      • Convert online FLV Videos to MP3 or AVI or WMA...
      • Download online .FLV videos from any site includin...
      • How to download online videos from any website!
      • How to Auto Start Applications on the Mac
    • ►  June (6)
    • ►  May (13)
    • ►  April (10)
    • ►  March (5)
    • ►  January (2)
  • ►  2007 (33)
    • ►  December (8)
    • ►  November (1)
    • ►  October (4)
    • ►  September (10)
    • ►  August (1)
    • ►  July (2)
    • ►  June (1)
    • ►  May (2)
    • ►  April (1)
    • ►  February (2)
    • ►  January (1)
  • ►  2006 (137)
    • ►  December (1)
    • ►  November (1)
    • ►  October (1)
    • ►  August (1)
    • ►  July (3)
    • ►  June (9)
    • ►  May (20)
    • ►  April (22)
    • ►  March (33)
    • ►  February (20)
    • ►  January (26)
  • ►  2005 (55)
    • ►  December (12)
    • ►  November (19)
    • ►  October (9)
    • ►  September (15)
  • ►  2001 (1)
    • ►  January (1)
Powered by Blogger.

About Me

Unknown
View my complete profile