beyond teck

  • Subscribe to our RSS feed.
  • Twitter
  • StumbleUpon
  • Reddit
  • Facebook
  • Digg

Wednesday, 30 July 2008

The device driver for your network card is preventing PC from entering standby or hibernation

Posted on 16:23 by Unknown

I recently discovered another problem that comes up often when you update your computer to Windows XP SP3. It seems as though you can’t put the computer into standby because somehow a network card prevents it from going to bed. Turns out, you now have to tell Windows XP that it can turn off the card to save power. Here’s how you can stop the computer from giving your errors when you put it into standby or hibernation. In addition to that, you can also prevent your computer from loosing the wireless connection when it resumes from standby or hibernation mode.

First, click on Start and then click Run. Of course, you’ll need administrator privileges to be able to do so. Then type in

ncpa.cpl

image

And in the window that comes up, right click on your wireless network card or network card in use at the moment. It’s usually going to have the blue monitors, if you have more than one network card, you’ll have to right click on the one that bears the word ‘wireless’ in its name. Then click ‘Properties’.

image

In the properties window, go to the ‘General’ tab and click Configure'.

image

Click the Power Management tab and uncheck the box that says Allow the computer to turn off this device to save power and click OK.

image

Once you do this, also click OK in the properties windows, and now your wireless card will play nice with the operating system. So, when you wake up your computer from standby or hibernation, it’ll make sure your card is able to go out and talk to your router (i.e. stay connected with the router) and it’ll also allow your computer to go into standby mode or hibernation mode without causing any errors.

Read More
Posted in error, Windows XP, wireless | No comments

Bypassing the Login or Welcome Screen in Windows

Posted on 16:01 by Unknown

If you happen to be lucky enough to have a computer that only you use on a regular basis, allowing the computer to automatically load your user account right after booting-up might save you a lot of time. I often do this on my old windows computer that has Windows XP, and since it doesn’t contain any sensitive information because it takes ages to boot up. So, I simply turn on the computer, go for a walk, have some coffee, take a nap and when I come back my ol’ faithful computer will always be ready to rumble. If you too would like to do this, here’s how you can do so.

First, keep in mind that automatically logging into your account might not be a good thing, especially if you have all your passwords stored on your web browser. So if you’re paranoid about someone logging into your account, you might want to delete password/temporary files/cookies information from your PC first before implementing the bypass screen hack.

Notice how I only have one account on my computer, however if you have two, Windows will ask you which one you want to use:

image

Once you confirm that you have only one account (without any other accounts such as the guest account enabled) click on Start and click Run. If you're running Windows Vista, you'll have to click on the Windows Orb/Start Button and type in the following in the search box. Inside the box that pops-up type in:

control userpasswords2

like so:

image

Then, in the box that pops-up just uncheck “Users must enter a username and password to use this computer”. And click OK. If you have more than 1 user on your computer, windows will ask you which user's account you'd like to use and you'll have to provide the password for that user.

image

Once you do so, your computer will automatically take you to your account right after boot-up, so you don’t have to wait for couple of hours more after clicking on your account name when you get the ‘Welcome’ screen (or password prompt).

Read More
Posted in tip, Windows Vista, Windows XP | No comments

Tuesday, 29 July 2008

5 Cool Tips for Creating Better Scans

Posted on 12:04 by Unknown

If you tend to scan a lot of stuff, these tips might be really helpful. A while ago, I had to scan a whole book, and I realized that the default scan settings just weren't good enough. Especially for pictures and mathematical notations. They just don't seem to come out properly. So if you would like to tweak your scanner settings to create better quality scans then read on...

Turn off Auto Cropping

The number one problem I find that my scanner (notice I say my scanner, which might mean that such problems might be confined only to the scanner I have) does not seem to do a good job if I simply set the mode for scanning. Nor does it scan everything I place on the flat bed, it seems to crop things out, thinking it to be unimportant. Not only it this super annoying, but it also wastes a lot of time, so here are a couple of settings (applying these settings will of course, differ depending on your scanner, so you'll have to check the manual)

In my case, it was opening up the set-up utility, going to advanced settings for scans and selecting the area to be scanned. Since most of the stuff I scan in letter format, I usually keep it on letter.

selectareascanned

Choosing the right DPI

Usually, scanner do not scan at a high DPI, unless you specify it to. However, unless you're really running low on hard disk space, I recommend that you should bump up the DPI settings to at least 300 DPI. Yes, the time it takes to scan something will take much longer, but the quality will be much better. Of course, once you have the actual scans you can do whatever you want with them, even reduce the quality if need be. Plus, if you were to print out (especially if you were to create big size posters) these picture or documents that were scanned at a high DPI, the image quality of the overall print will be significantly better. So, if you have the option, make sure you scan at 300 or the highest DPI possible.

highdpiscan

Always scan everything in colour

Why would you scan things in black and white, if you're transferring the data to your computer instead of directly printing it out. Scanning in colour gives you the option to do whatever you want with it once you've scanned it. I also find that a lot of detail is ignored by the scanner when it scans simply in black & white. If you want to be on the safe side, I'd say colour is the way to go.

Scanning dark text on a light background

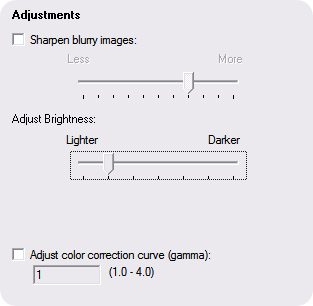
Often, I find that scans of light text on a dark background are less than satisfactory. Especially if the light text is white and the dark background is black. It seems that most scanners have the options of specifying the brightness of the image being scanned, so in such cases it is best to bump up the brightness a little bit. It might help in getting a better result.

adjustments

Remove Patterns on Paper

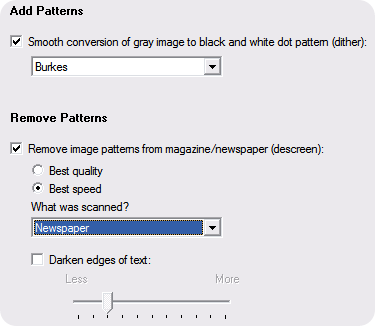
Another great features that scanners have is to automatically, although not accurately, detect any unwanted patterns in the background of the item being scanned. For example, if the paper you are scanning is a bit crinkled, it will automatically try to remove the marks on the paper, resulting in a better scan overall.

addpatterns

Following the tips above when you scan something will assuredly improve the quality of scans.

Read More
Posted in peripherals, tip | No comments

Saturday, 5 July 2008

Microsoft Word - Disable automatic hyperlinks

Posted on 19:45 by Unknown
Don't you just hate having to deal with those annoying hyperlinks every-time you type in a website or e-mail address in Microsoft Word? Not only does it look horrible when you print the document out (especially if you're doing a resume or a report). Plus, if you accedently click on it, I find that the computer slows down to a crawl for several seconds before responding to the click – not exactly great if you ask me. 

Here's how you can turn off this annoying feature (if you in fact find it annoying like me) for good. You can of course right click on the hyperlink and click 'Remove Hyperlink' or if you're on a Mac right click and 'Edit Hyperlink' > 'Remove Hyperlink', but I simply prefer a much more permanent solution.


The solution to this is pretty simple:

How to turn off automatic Hyperlinks in Microsoft Word!

1. Click on the Tools menu in the menubar and click 'AutoCorrect Options'. If you're on a Mac you can click on 'Microsoft Word' in the menubar and click 'Preferences'.
2. Click on AutoCorrect Options.
2. Switch to the 'AutoFormat As You Type' tab
4. Uncheck the checkbox beside 'Internet and network paths with hyperlinks'

5. Click OK.

Viola! No more automatic yucky hyperlinks!
Read More
Posted in Mac, Microsoft Word, tip, Windows | No comments

Security Errors Detected!

Posted on 14:59 by Unknown
It's times like this when I say to myself. Wow, isn't it great I have a Mac. Sure, only a small percent of people use a mac, but at least I won't have to worry about sites like this:

Read More
Posted in Mac, Windows | No comments

Back up and Restore your Address Book Contacts on OS X

Posted on 09:03 by Unknown
Having your contacts stored in a digital format on your Mac can mean one of two things:
1. It is highly accessible and searchable.
2. You can loose it in a flash if you don't back it up.

When the work back up comes to mind most people think of a .mac account or something similar, however you really don't need a .mac account (or a mobile me account for that matter) to be able to back up data on your mac. All you need is to know how to do it with Address book.

How to back-up data and contacts on Address book in OS X 10.4 Tiger

Backing up your address book on Tiger is actually more easier than doing so in Leopard. All you need to do is click on
1. File in the menubar
2. Back up Address Book

How to back-up data and contacts on Address book in OS X 10.5 Leopard

If you're in Leopard you'll need to do this:
1. Click on File in menubar
2. Click on Export
3. Click Address Book Archive


Also keep in mind that contacts that were backed up on an older version of OS X will import / restore fine into a newer version. However, you cannot import contacts into an older address book version (such as the on in 10.4 Tiger) from a newer one (like the one in 10.5 Leopard). So you might have to export each contacts vCard which you can then import into Tiger's address book or an older address book version.

How to restore data and contacts on Address book in OS X 10.4 Tiger

To restore you data simply do the following:
1. Click File in the menubar
2. Click 'Revert to Address Book Backup'
3. Browse for a backup you have your computer (hopefully you've managed to make a backup before you realized you have to restore something.

How to restore/revert data and contacts on Address book in OS X 10.5 Leopard

If you're in Leopard you'll need to do this:
1. Click on File in menubar
2. Click on Import
3. Click Address Book Archive

Now you have no reason to not backup your contacts.
Read More
Posted in Mac, tip | No comments

Tuesday, 1 July 2008

Clear Passwords, Private Data, Cache, Cookies and History in Browsers

Posted on 18:17 by Unknown
Often, browsers such as Internet Explorer or Firefox store data in their cache. Data such as browsing history, form data (your name, address, phone number etc. that you filled in while buying stuff from amazon!), passwords and snapshots of web pages are collected. Now, if you were a paranoid user, you'd probably disable all these features.

But they were simply put in there to make our life much more easier. Internet Explorer (or any other browser for that matter) stores our passwords so we'd never have to type them again. It stores our webpages so that we'd never have to wait for it again. It stores our name so that we'd never have to remember it again. Yes. That's how much we can leave to the computers to remember.

However, what do you do if you don't want the browser to remember it? This article explains how to clear your private data for Internet Explorer 7, Internet Explorer 6, Mozilla Firefox and Safari.

Note: If you are using Internet Explorer or Firefox or Safari or any browser in a public setting (office, school, libraries, community centers), these tools menu and settings mentioned below are usually DISABLED! The only way to make sure that the computer doesn't remember your password when you're checking your e-mail is to make sure the 'Don't remember my password box' is unchecked! Most organizations make sure that your data is deleted every time you log off, but better to be safe than sorry!

You might also want to use this method to make Internet Explorer or Firefox run faster if you find that your browser is running too slow, and you're using Windows XP or Vista.

Clear Private Data, Empty Caches, Delete Passwords and and Remove Cookies in Internet Explorer / Firefox / Safari and so on.

Doing so is pretty simple for each browser:

How to clear private data in Internet Explorer 7

1. Open Internet Explorer
2. If you don't see the menubar it's probably hidden. Press the Alt key so that it will reveal itself.
3. Click on Tools and Click Internet Options

4. In the Internet Options Window click on Delete button under the 'Browsing History' Heading.

5. Then click on Delete corresponding to the information you want to delete.
6. If you want to delete everything just click on the Delete all button.

How to clear private data, passwords, cache and cookies in Internet Explorer 6

1. If you have the older version of Internet Explorer, I strongly urge you to update your computer. However, if you're using Internet Explorer in a public setting -- like a library or at your school/office.
1. In the Tools menu, select Internet Options... .

2. Click the Content tab, and then click the AutoComplete... button.

3. To remove stored passwords, click Clear Passwords.

To clear stored data that you have entered into forms, click Clear Forms.

4. Click OK.

To delete other internet cache data you'll have to use this method. Using disk-clean or CCleaner up will also clear your cache and other data that Internet Explorer had.

How to clear private data, passwords, cache and cookies in Firefox

Clearing private data in Firefox is even easier.
1. Click on Tools in the Menubar and then click on 'Clear Private Data...'


2. In the window that pops-up, choose the information that you'd like to delete. I always delete everything except my passwords, because its really hard to remember the password given the amount of sites one has to register to...

Clearing Private Data, History, Password and Cache in Safari

Safari on the other had has several different options that you can use to delete data.

Clearing only the history

To do this simply click on 'History' in the menubar and then on clear history at the bottom of the menu.

Clearing only the cache

If you only want to delete the pages that were stored in safari, you might want to click on 'Safari' in the menubar and click on 'Empty Cache'. This will only delete the cache.

How to clear everything including cookies, cache and history and reset Safari

To do this click on 'Safari' in the menubar and click on 'Reset Safari...'. A window will pop-up asking you what you'd like to clear. Simple check the checkboxes corresponding to the information you'd like to clear and click OK.


Read More
Posted in firefox, internet explorer, tip | No comments
Newer Posts Older Posts Home
Subscribe to: Posts (Atom)

Popular Posts

  • 5 great add-ons for Internet Explorer 7
    If you haven’t yet upgraded to Internet Explorer 7, I’d say its high time you do so. If you’re still using IE 6, you’re missing out on a lot...
  • WeTransfer Job Ad
    I like using WeTransfer to transfer things that don't fit in emails, mainly because the site is fast, has a large upload limit (2GB!) an...
  • Contact Me!
    Okay so you want to contact me for something? No Problem! E-Mail You can send all your questions , comments , tips (I need a lot of those)...
  • The Nintendo Wii..
    The first thing that comes to my mind is the Wheee! Firefox flick by Jeff Gill. Except this time the IE logo is replaced by the Nintendo Wi...
  • Installing Ubuntu without a CD drive using USB drive
    With the latest release of Ubuntu, I feel that more people will have access to a highly mature, fast and easy to use operating system. But u...
  • How we depend on technology in school
    Today I was just finishing up my Geo project and I realized (just like my other 'realization' moments that I've documented in t...
  • How to find out if a .exe process is spyware or virus
    Windows XP has thousands and thousands of .exe files, and usually a lot of those executables are running at any given time. But are all of t...
  • How to watch cricket online for free
    I have a confession to make - I'm addicted to cricket. I pretty much can't live without watching cricket matches (especially if Indi...
  • Adium Update
    Looks like Adium (or Adium X) was updated. Now of course Adium isn't the messenger I use most (I use Trillian + Windows Live Messenger...
  • How to reduce PDF file sizes on a Mac
    Update : Doesn't seem like this method works well for all files, you may want to try out the link posted in the comments, as this seems ...

Categories

  • addons
  • adobe
  • ads
  • adsense
  • apple
  • audio
  • blackberry
  • blog
  • blogger
  • blogging
  • cars
  • cellphones
  • clean
  • code
  • comments
  • cricket
  • downloads
  • ebooks
  • email
  • error
  • file sharing
  • firefox
  • fixes
  • free
  • games
  • gas
  • Gmail
  • google
  • hack
  • hotmail
  • installs
  • instant messaging
  • internet
  • internet explorer
  • ipod
  • laptop
  • Linux
  • Live Writer
  • lol
  • Mac
  • mac. mail
  • mail
  • messenger
  • microsoft
  • Microsoft Word
  • money
  • msn
  • music
  • Musings
  • network
  • news
  • online
  • Outlook
  • page
  • peripherals
  • phones
  • photo
  • photoshop
  • php
  • plagiarism
  • problems
  • productivity
  • programming
  • projects
  • rant
  • Registry
  • Review
  • school
  • Screenshots
  • search
  • security
  • software
  • spam
  • speech
  • speed up windows
  • spyware
  • sysfader
  • technology
  • tip
  • tricks
  • tutorials
  • ubuntu
  • updates
  • video
  • virus
  • voip
  • web
  • wi-fi
  • Windows
  • Windows 7
  • Windows Vista
  • Windows XP
  • wireless
  • work
  • wtf
  • youtube

Blog Archive

  • ▼  2013 (5)
    • ▼  October (2)
      • WeTransfer Job Ad
      • iPhone Searching... No Service/No Reception Problem
    • ►  August (2)
    • ►  March (1)
  • ►  2012 (6)
    • ►  December (1)
    • ►  October (1)
    • ►  June (1)
    • ►  May (1)
    • ►  January (2)
  • ►  2011 (19)
    • ►  October (1)
    • ►  August (1)
    • ►  July (8)
    • ►  June (1)
    • ►  February (4)
    • ►  January (4)
  • ►  2010 (41)
    • ►  November (1)
    • ►  October (3)
    • ►  September (3)
    • ►  August (2)
    • ►  July (12)
    • ►  June (2)
    • ►  May (5)
    • ►  April (3)
    • ►  March (4)
    • ►  February (4)
    • ►  January (2)
  • ►  2009 (59)
    • ►  December (1)
    • ►  November (1)
    • ►  October (1)
    • ►  September (3)
    • ►  August (4)
    • ►  July (4)
    • ►  June (14)
    • ►  May (1)
    • ►  April (3)
    • ►  March (3)
    • ►  February (4)
    • ►  January (20)
  • ►  2008 (108)
    • ►  December (22)
    • ►  November (10)
    • ►  October (14)
    • ►  August (13)
    • ►  July (13)
    • ►  June (6)
    • ►  May (13)
    • ►  April (10)
    • ►  March (5)
    • ►  January (2)
  • ►  2007 (33)
    • ►  December (8)
    • ►  November (1)
    • ►  October (4)
    • ►  September (10)
    • ►  August (1)
    • ►  July (2)
    • ►  June (1)
    • ►  May (2)
    • ►  April (1)
    • ►  February (2)
    • ►  January (1)
  • ►  2006 (137)
    • ►  December (1)
    • ►  November (1)
    • ►  October (1)
    • ►  August (1)
    • ►  July (3)
    • ►  June (9)
    • ►  May (20)
    • ►  April (22)
    • ►  March (33)
    • ►  February (20)
    • ►  January (26)
  • ►  2005 (55)
    • ►  December (12)
    • ►  November (19)
    • ►  October (9)
    • ►  September (15)
  • ►  2001 (1)
    • ►  January (1)
Powered by Blogger.

About Me

Unknown
View my complete profile